Last Updated on April 1, 2023
When a user uploads an image, WordPress will generate several images by default, in the following sizes [1]:
- Thumbnail =
150 x 150 px - Medium =
300 x 300 px - Medium_large =
768 x 0 px - Large =
1024 x 1024 px - 2x Medium Large =
1536 x 1536 px - 2x Large =
2048 x 2048 px - Big (*-scaled) =
2560 x 2560 px
Note: in the Medium_large size (768 x 0 px), zero pixels mean height of the image has no limit set. That is, the width of the image will be 768 px, whereas the height is proportionally based on the origin image.

WordPress doesn’t necessarily generate all image sizes, but only generates the ones smaller than the original image size. For example, if you upload an image of 800 x 600 px, then WordPress only generates Thumbnail, Medium, and Medium_large sizes.
Is it necessary?
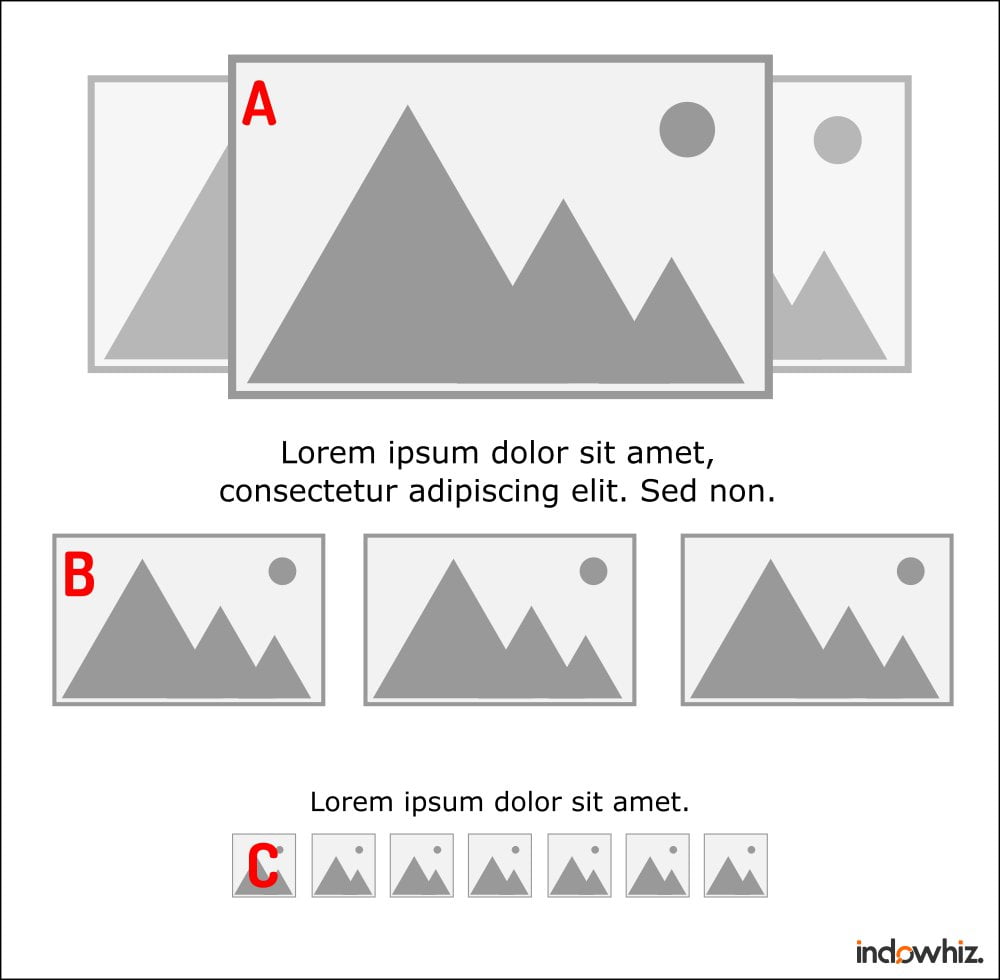
Different image sizes offer different functionality. On a web page, it is essential to find a balance between page loading speed and the quality of the shown images. By using the appropriate dimension of an image, it can reduce unnecessary load while maintaining image quality. Let’s take a look at the following Fig 2.

Sometimes, you may need to display either “Medium_large ” or “Large” image size (i.e., Fig 2 point A). You don’t want to display a blurry or grainy image to the readers, because its size is not large enough.
On the contrary, placing several “Thumbnails” images is sufficient to fill the boxes in Figure 2 point C. Due to the indistinguishable details, there is no point in loading large image sizes. Using the “Thumbnails” size effectively suppresses the number of bytes sent from the server to the browser. As a result, it will speed up page loading.
Without this feature, you may need to manage the dimension in each of your images using third-party software, manually. With this feature, WordPress saves you the trouble [2].
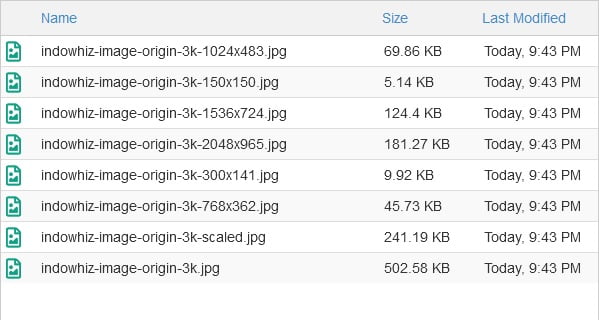
However, keep in mind that, having the same images in different sizes takes extra storage space. In a scenario (Figure 1), uploading a 502 KB (i.e., 3000 x 1414 px) image, led WordPress to generate 7 images totaling over 677 KB.That is, you may need over twice as much space as the original image.
To optimize your website, it is important to know the exact dimensions required for each page. You could edit or disable the WordPress default image size generations. However, trying to use fewer image sizes is better.
Managing image generations
Using a plugin
Generally, it is highly recommended to use a plugin for this task. Because it is more convenient and practical. The two most commonly used plugins to manage image size generations are as follows:
- Stop Generating Unnecessary Thumbnails by Codexpert
- reGenerate Thumbnails Advanced by ShortPixel
Both plugins offer the convenience of enabling or disabling each image size as needed. In addition, they offer a function to remove unused sizes and regenerate the selected sizes in all of your images.
Without a plugin
You can also enable/disable the WordPress image size generations without a plugin. However, it involves rather complicated steps.
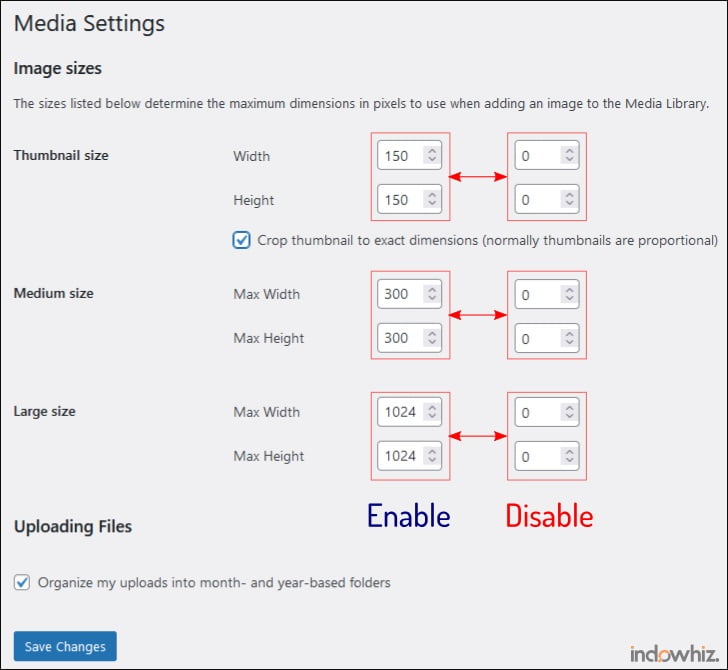
To manage the “Thumbnail”, “Medium”, and “Large” image size generations:
- On the WordPress admin page, go to
Settings>Media - In media settings, as in Fig 3:
- To disable the generation (e.g. “Thumbnail” size), fill the width and height dimensions with
0(zero). - To enable/change the image size for future generations, fill the width and height dimensions according to your needs.
- To disable the generation (e.g. “Thumbnail” size), fill the width and height dimensions with

Note: changing only Width or Height (not both) with zero, causes WordPress to generate image size proportional based on the non-zero dimension value.
Meanwhile, you need the following code snippet to disable 4 other hidden image sizes (i.e., “Medium_large”, “2x Medium Large”, “2x Large”, and “Big”). However, if you need to enable any of the image sizes, simply remove the unnecessary part of the code.
/* Run snippet everywhere */

// Disable "Medium Large" (768 x 0)
add_filter('intermediate_image_sizes', function($sizes) {
  return array_diff($sizes, ['medium_large']);
});

// Disable "2x Medium Large" and "2x Large"
add_action( 'init', 'remove_1536_n_2048_image_sizes' );
function remove_1536_n_2048_image_sizes() {
  remove_image_size( '1536x1536' );   // Disable 2x Medium Large
  remove_image_size( '2048x2048' );   // Disable 2x Large
}

// Disable generation of big image size"*-scaled.jpg"
add_filter('big_image_size_threshold', '__return_false' );
You could also add a custom image size, using the following code snippet [3].
// Add custom image size
add_image_size( 'custom_size_name', 1600, 1600 ); //max width and height in pixels
Optimizing the file size
Unless you work on gallery or multimedia website, you may want to optimize the file size each image. Such optimization means compress your image file size.
You can use any image optimization plugin or online tools. In the end, this optimization may increase your remaining space a lot.
References
- [1]J. Gererstorfer, “Disable WordPress Image Sizes – How-to,” Bloggerpilot, Jul. 28, 2022. https://bloggerpilot.com/en/disable-wordpress-image-sizes/ (accessed Oct. 07, 2022).
- [2]S. Ravoof, “Everything You Need to Know About WordPress Image Sizes,” Kinsta, Sep. 16, 2022. https://kinsta.com/blog/wordpress-image-sizes/ (accessed Oct. 07, 2022).
- [3]T. Antoniou, “WordPress Image Sizes Explained,” Pressidium, Dec. 11, 2021. https://pressidium.com/blog/wordpress-image-sizes-explained/ (accessed Oct. 07, 2022).


