There are many cases where collaboration is needed to complete or review a word document. Then, sometimes referring to content in specific lines in a document could be troublesome and time-consuming. For example, we could say “please refer to the explanation of X on page 10 starting at line 18!“. Without line numbers, we need to count the line from the beginning of the page to a certain line, as well as people who read it.
Fortunately, Microsoft Word has a feature to display the line numbers in the document [1]. Using this feature, we can display line numbers throughout the document or in some parts of it. However, the line number can’t be displayed in tables, footnotes, endnotes, text boxes, and headers and footers.

Adding line numbers
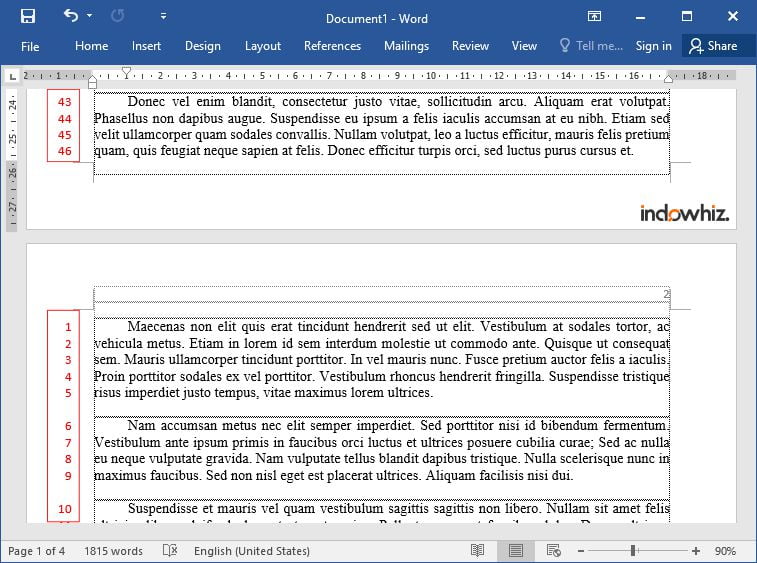
As in Fig 1, the steps to adding line numbers are as follows:
- Go to the
Layoutmenu; - Then in the
Page Setupgroup, clickLine Numbers; - Click one of the following options:
Continuous: To display line numbers consecutively throughout the document.Restart Each Page: If we want to display line numbers starting with number 1 on each page.Restart Each Section: To display line numbers starting with number 1 after each section break.Line Numbering Options...: For more advanced options, such as margin and intervals. See more detailed explanation in section Formatting line numbers.
Removing line numbers
As in Fig 1, the following steps are used to remove line numbers:
- Click the document, or select sections or paragraphs from which we want to remove line numbers;
- Go to the
Layoutmenu; - Then in the
Page Setupgroup, clickLine Numbers; - Click one of the following options:
None: To remove line numbers throughout the document or section.Suppress for Current Paragraph: To remove line numbers from the selected paragraphs.
Formatting line numbers
Advanced options
The advanced options could be found in the following steps:
- Go to the
Layoutmenu; - Then in the
Page Setupgroup, clickLine Numbers; - Click
Line Numbering Options...; - In the
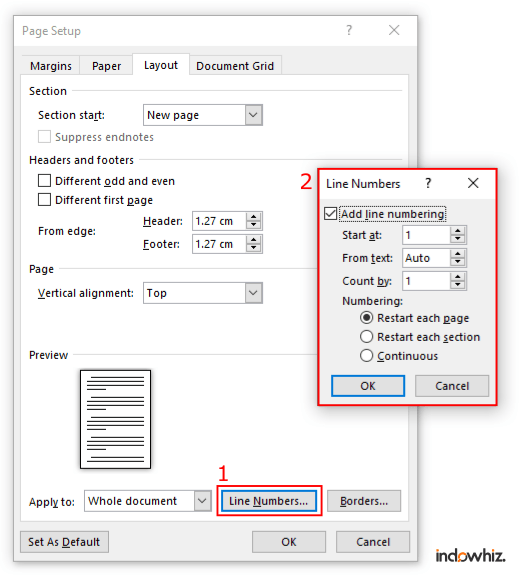
Layouttab of Page Setup, clickLine Numbers..., as seen in Fig 2 point 1; - Then in Fig 2 point 2, adjust the setting as you need;
- Click
OK.

The explanation of advanced options in Fig 2 point 2 are as follows:
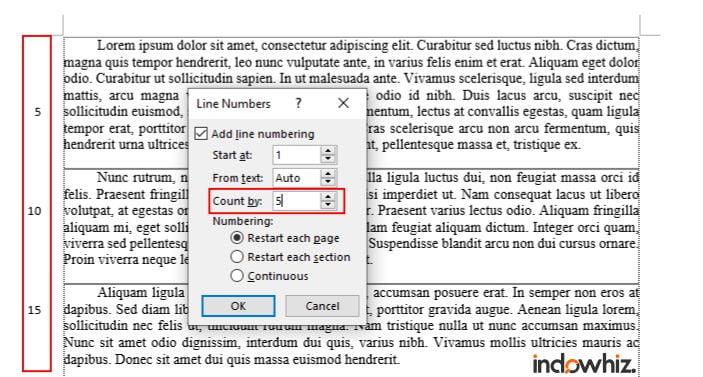
Start at: The starting number. By default,1is the starting line number.From text: The distance between the line number and the line text (defaultAuto).Count by: Display line numbers at specified interval (default1). For example, if we setCount by = 5, it will display line numbers in every fifth line, as seen in Fig 3.Numbering: The way to display line numbers, as explained in the section Adding line numbers.

Style formatting
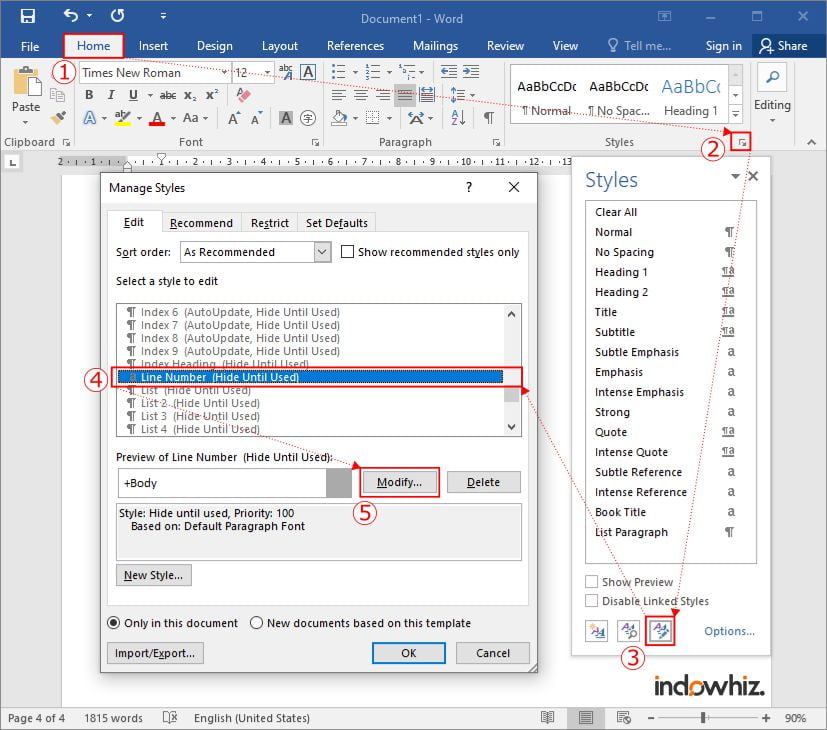
We could also change the style of the line number, such as change its color and font [2]. As in Fig 4, the steps are as follows:
- Go to
Homemenu; - Then in the
Stylesgroup, click theDialog Box Launcherbutton. It is a small button in the lower-right corner of theStylesgroup; - Click
Manage Stylesbutton; - In the
Manage Stylesdialog box, find and selectLine Numberin the style list; - Click
Modify...; - Adjust the style as you need, then click
OK.

References
- [1]Microsoft, “Add or remove line numbers,” Microsoft Office Support. https://support.microsoft.com/en-us/office/add-or-remove-line-numbers-b67cd35e-422c-42eb-adc9-256ca9802e22 (accessed Sep. 18, 2021).
- [2]A. Wyatt, “Formatting Line Numbers,” Tips.Net, Feb. 13, 2016. https://wordribbon.tips.net/T006272_Formatting_Line_Numbers (accessed Sep. 18, 2021).


