You start connecting a host computer using Remote Desktop Connection (RDC) from your PC/laptop. You can successfully login with your username and password. But, after that you experience a blank or black screen. And you have error message, such as:
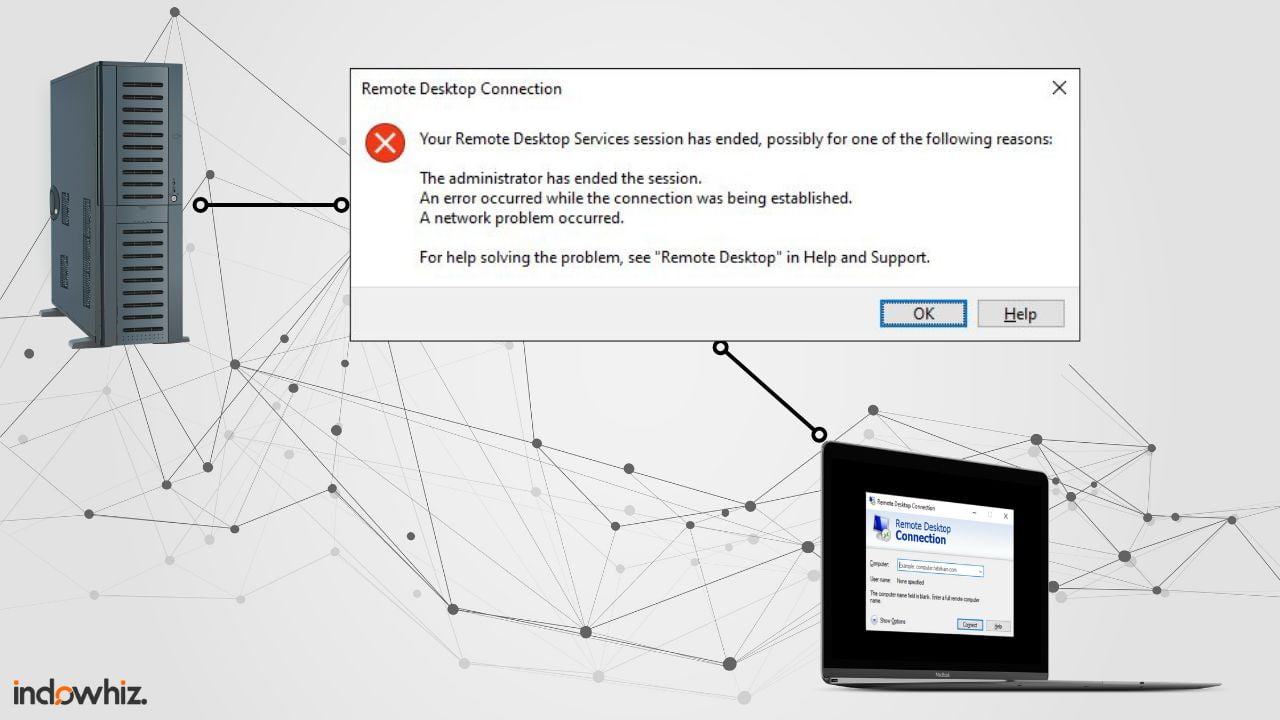
Using RDC on PC/laptopYour Remote Desktop Service session has ended, possibly for one of the following reasons:

The administrator has ended the session.
An error occured while the connection was being established.
A network problem occured.

For help solving the problem, see "Remote Desktop" in help and support.
which has no useful information, or this
Using RD Client for AndroidYour session was disconnected
The graphics display components in the remote session failed to start up.
Error code: 0x12
In my opinion, this issue is most likely due to a problem with Windows RDC application on the host computer. This is because the host computer is still accessible using other remote applications, including Google Remote Desktop and TeamViewer.
Solution 1: Reducing remote quality
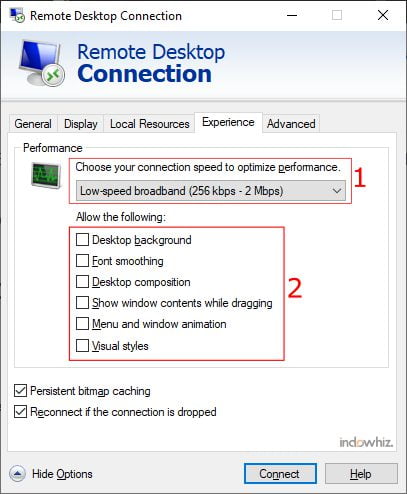
On the client computer, open the Remote Desktop Connection. If you can not find any options (as in Fig 1), click ▼ show options. Then, do the following:
- Go to the
Displaytab, then:- under
Display configuration, use the same resolution as the host computer (if applicable). Otherwise, set a smaller resolution.
- disable
Use all my monitors for the remote sessionoption. - under
Colors, select the lowercolor depth(e.g.,15 bit).
- under
- Go to the
Experiencetab, then:- select the lower
connection speed, and - disable all of the visual quality (e.g.,
Desktop compositionandVisual styles). - If necessary, also disable the
Persistent bitmap caching.
- select the lower
- Go to the
Local Resourcestab, then:- under
Local devices and resources, uncheck thePrintersoption.
- [optional] under
Remote audio, clickSettings..., and disable the audio by selectingDo not playandDo not record.
- under

Note that this solution has a small chance of solving the issue.
Solution 2: Reboot host computer
This RDC black screen issue may easily be resolved by restarting the host computer. But, how you do that?
Well… usually, you can still access it by using other remote apps, including Google Remote Desktop and TeamViewer, or even using SSH. Then, after restarting the host computer, you can use Windows RDC again.
Otherwise, there is no known solution other than to physically restart the host computer. You can ask someone that is physically close to the host or remote computer, if applicable.
Note: Before restarting the host computer, make sure there are no essential applications that may still be running and haven’t been saved.
Solution 3: Update/roll back GPU driver on host computer
You can try this solution if you can still access it by using other remote apps or after restarting the host computer.
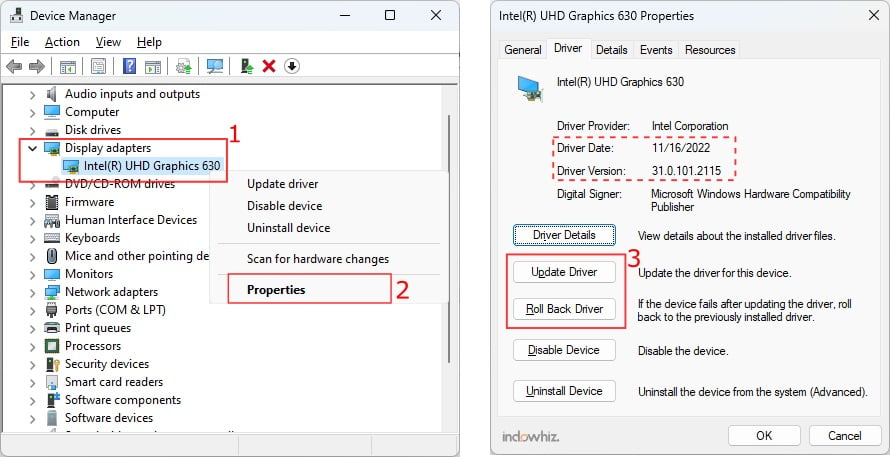
First, on the host computer, you need to open the GPU driver in the device manager, as follows:
- open
Control Panel, by going toWindows Start menu, then typeControl Panel. - change
View bytoLarge icons - right click on
Device Manager, thenRun as administrator. - under
Display Adapters, double-click the main GPU. You can also right-click on it and selectProperties.
Then, make sure your computer uses the latest version of GPU drivers.

Otherwise, if you encounter this RDC black screen issue after you update the GPU driver, you can Roll Back the GPU Driver to the previous version.
Solution 4: Update Windows or use XDDM display driver
You can try this solution if you can still access it by using other remote apps or after restarting the host computer.
As mentioned in Microsoft’s update page, KB4512941 may solve the black screen issue in RDC. You can install it in the host computer and restart it.
In addition, you may try to force RDC to use XDDM display driver. To apply it, in the host computer, do the following:
- Open
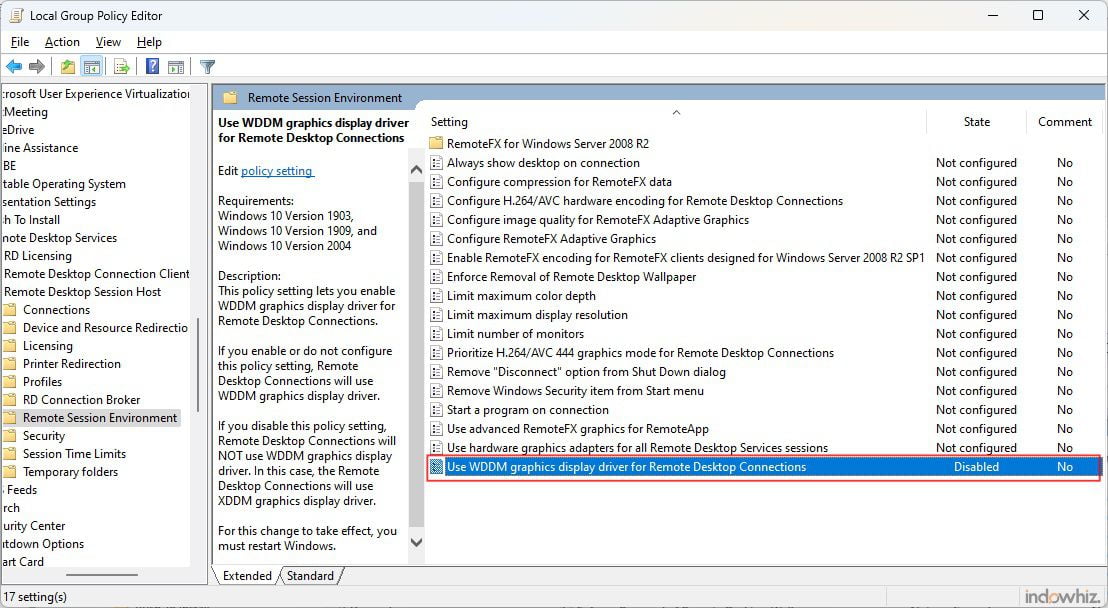
Windows Start menu, then typegpedit.mscandRun as administrator. - Navigate to
Local Computer Policy->Computer Configuration->Administrative Templates->Windows Components->Remote Desktop Services->Remote Desktop Session Host->Remote Session Environment. - Set the policy of “
Use WDDM graphics display driver for Remote Desktop Connections” from “Not configured” to “Disabled.” - Restart the computer.

If you cannot find this option in the Local Group Policy Editor, you can manually add the option to Registry using Command Prompt, as follows:
- on the host computer, open
Windows Start menu, then typeCMDandRun as administrator. - type
REG ADD "HKLM\SOFTWARE\Policies\Microsoft\Windows NT\Terminal Services" /v "fEnableWddmDriver" /t REG_DWORD /d 0 /fthen press enter.
Prevention
As far as I know in Windows, RDC is faster and more practical than other remote apps. However, sometimes you may encounter any issues with RDC, such as protocol error and black screen. So, to ensure that you can solve any RDC issues in the future, you need to set up other remote applications in the host computer.
You can use another application, such as Google Remote Desktop or TeamViewer. However, you must set it to automatically start when you login or restart your computer. So that you can access it using another remote application, anytime.
Then, if you have problem using RDC, you can connect using other apps you have set up. Then, restart the host computer, then try using RDC again.


